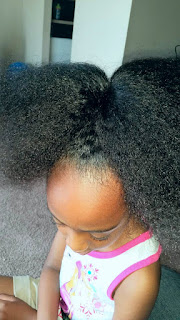
Hair Bow Pictorial!!!
Hey guys!!
So here is the pictorial that I promised you all. I'm going to keep it short and sweet.
PRODUCTS NEEDED: A brush, an Ouchless hair tie, gel or edge control, and bobby pins.
For this style, I washed and conditioned Amara's hair then blow dried it to stretch the hair. Blow drying is completely optional. If you are going to blow dry, remember to use a heat protectant!
PRODUCTS NEEDED: A brush, an Ouchless hair tie, gel or edge control, and bobby pins.
For this style, I washed and conditioned Amara's hair then blow dried it to stretch the hair. Blow drying is completely optional. If you are going to blow dry, remember to use a heat protectant!
1. Brush the hair into a high ponytail. Position the ponytail where you would want the bow to sit on your child's head. I wanted the bow at the top of her head so I made sure the ponytail was sitting on the top of her head.
Make sure that your child's edges are slicked down and neat. I used Eco Styler Olive Oil Gel for her edges.
2. Divide the ponytail in to two even sections
3. Take an equal amount of hair from both of the separated sections to make a smaller third section.
Keep the hair separated by twisting the two equal sections, leaving the third section free.
4. Now you're going to braid that third section. Just a regular three strand braid.
5. Next, flip the braid on top of the center part of your "bow". This is going to help define the bow shape. Use bobby pins to pin the excess braid or tuck it into the ponytail.
6. Now you are going to create the bow shape. Take one section of hair and twist it very loosely so that only the ends are twisted.
7. Take the twist and fold it back so that the end of the twist is behind the ponytail. Adjust to your desired shape and pin.
8. Do the same for the next section, adjusting the sides of the bow to get your desired shape.
That's it!!
Thank you for reading my blog! Please, if you have any suggestions, questions, comments, or things you would like to see featured on this blog, please leave them in the comment section!
IG: @kiddiecurls


No comments:
Post a Comment